cat basket


As I travel and am away from my drawing equipment more and more, I decided to invest in an ipad and apple pencil. I started to play with an app that tons of my artist friends have been raving about – procreate. Last night I discovered that it records the creation process! I’m sharing it here:

Tomorrow I will be speaking at St. Victors in San Jose with Gene Yang, if you’re around please join us.

I hope you have a lovely weekend.

nachle

I had every intention of completing this drawing of our family dancing. Some of our best days are when the hubbahubba puts on a record and our daughter demands that we get up to dance (mostly to chaiyya chaiyya). Like many things this year, though, I did not have enough time. So I share it in its raw sketchy state as it still captures our joy.

It’s been a strange, exhausting year. Aside from sharing PASHMINA across the country, creatively the best art I shared were my free resistance coloring pages. Most of my other work I cannot share yet. In fact one of my projects, a picture book titled I WILL BE FIERCE was just announced.

For the first time in my years of working independently, I am taking 2 full weeks off for the holidays. Not working late on Christmas eve, not missing catching up with friends and family and taking a much needed mental break.

Thank you for all your support & shares. I hope you have happy, warm holidays.


leaf play

leafplay

My theme for inktober is fall favorites. If you have a fall favorite you’d like to see my draw, leave a comment and I may draw it!

One of the things I enjoy the most about the inktober challenge is using color in harmony with the ink. I realized that if I don’t ink the outlines of all the elements (in this case the leaves), I can give the appearance of a foreground and middle ground. That means that the ink can pop forward and the color, even though its everywhere, has a more subtle quality.

SOLD! They measure 2.5×3.5 inches on bristol board made with a combination of brush pen, color markers, microns and a little dash of colerase pencils. I will update the post with sold if they’re gone ^_^


cooking with you

nidhi-chananiprocess Cooking with you I recently did a set of commissions and loved how thehubby described their cooking sessions – he made the food while she snatched samples along the way! Ive been asked about my process for awhile so I thought I would create a short gif to give some insight. I begin in flash with a line drawing, then I draw over that with solid color. I export my flash file in layers to photoshop and add shadows, lighting and adjust the colors.I hope you have a happy week!

night duel + urban epicurean festival

dueldeux duel1 Very early in my career my hard drive crashed and I lost the full resolution files of my illustrations. Duel was one of them – and as my work has been featured on different websites I’ve been asked for it as a print. Sadly I cannot recreate it – but I did revisit it! It was so much fun – it gave me a chance to truly see where I’ve grown. I understand anatomy and character weight better, but also light and shadow. I still have a long way to go but I know from years of experience my best route to improvement is to keep drawing. ^_^

Meanwhile, this weekend I will be at the Urban Epicurean Fest in San Francisco selling prints, cards and calendars with the wonderful Lyla Warren ofLittle Brigade. She’s coming from Portland to share her lovelySeedlingswith you all! Littlebrigade_seeds_of_love If you’re around please come by and say hello!

priyanka

prisss


I’m back in the studio after a 2 month break to be with my daughter. It’s the longest break I’ve had from art in 5 years! My biggest project is working on the final art for my graphic novel, Pashmina. As I opened my completed pages I noticed my main character, Priyanka, looked different in a few panels. I started to worry that I wouldn’t be able to keep her consistent throughout the book. As I revised the panels that bothered me, I thought about how much work isn’t seen by the reader. There’s so much pre-work – sketches, notes, ideas, drafts. Through the next few months as I work on final art I want to share some glimpses of the pre-work with you.

As I worried about character consistency, I pulled up a file with a bunch of Priyanka expressions I drew during the thumbnail process. This exercise not only gave me an idea of her personality, but also how to draw her face up, face down, and from the side. Once I brought this file up, I felt calm. I already did the work that could help me with consistency. I use the file for reference through each page.

This is my first attempt at a graphic novel. The whole process is a learning experience. By the time you hold a copy in your hands, each page will have been revised, redrawn and edited at least eight times. The manuscript had five drafts. The thumbnails had three rounds of editing. The final art will no doubt have at least two. Some pages are easier than others. I’ve read about other creator’s processes in writing and drawing. I’m sure I’m doing things wrong and I know I’ve made lots of mistakes. I’m okay with that. Once I finish, I will know what works for me.

For now, I must push forward, making mistakes and learning along the way.

fluffy friend and brush pen tips

fluffyfriend This is one of my recent evening brush pen sketches. In art school I was incredibly uncomfortable with the brush pen – it was a challenge. After years of practice drawing WITHOUT it I have a much better feel for it. Why? Because I have put in hours and hours of drawing time to understand form, shape and my own limitations (which are many). I start with a loose drawing in color pencil (usually whichever pencil is closest and sharpened, in this case it’s orange) and after I have the sketch, I bring out the brush pen. I ink over the lines as confidently as possible. The most important piece of this, which I didn’t understand before, is to commit. Once I put the ink down I cannot go back. I must be sure. I try not to lift the pen, to make solid, fluid lines. Some artists remain sketchy and loose at the ink stage, which is achieves another lovely look. I like the clear, solid lines so I attempt that. My favorite part of the process are the accents that appear due to the brush and paper texture. When I push down to make a thicker line, or pull back for a thinner line, the organic cracking and grain is so visually pleasing! I have more brush pen sketches on my Facebook page ^_^ Have a happy Friday!

little light

littlelight

I created this entirely in photoshop in 30 minutes – I usually do the base drawing in flash. I wanted to explore painting on just one layer but old habits die hard! I ended up with 12 layers but that’s a big change for me.

I woke up with this image in my mind because I felt a bit crushed by the news… it feels as though all we have is a little light – but hopefully that’s enough to grow out of these shadows.

burn to shine

minis


I am super excited to announce my solo show at Trickster in Berkeley in November. Burn to Shine: 100 mini wood burnings (all the pieces will also be available for purchase online, each piece will be $65). The opening reception will be November 1st. I am posting my progress on Instagram and Facebook. Between now and November I will create 80 more pieces! It’s the largest number of wood burnings I’ve set out to create to date. It’s incredibly fun to explore different animals, backgrounds, and patterns. I create many with mehndi patterns in mind, but I also love burning waves and using negative space to create a soft and subtle environments.

I also wanted to take this opportunity to share a bit about my materials and process!

woodburningmaterials


1. Wood slices. I obtain these from either Etsy, Michaels arts & crafts or Amazon. I shop for wood that is light in color without any dark marks or knots. If there are marks, I try and incorporate them into the work. The wood type varies from walnut, basswood, to cherry and oak.

2. Colwood Cub electrical unit. This unit heats my pens, it has great temperature control and its portable with a long enough cord so I can burn in my studio or living room (it smells so good!). I usually keep the temperature between 7 and 8, but when I want to create a softer, lighter background or environment I will turn it down to 6. I have never gone past 9, I think I’d burn my fingers!

3. A finished piece for the show!

4. A mechanical pencil. I use this to draw the character on the wood before burning. I never draw in pattern or background, only the central figure. Background and pattern I create in the moment. It’s my favorite part. It feels meditative and organic.

5. My two favorite fixed pens. I use both of these on each piece. One creates a thicker line I use for outlines of shape and the other I used for details like eyes, lips, and sometimes pattern.

6. Replaceable pen and replacement tips. I use these pens less often, but I do love the variety and texture I can get from them. There are two kinds of pens: fixed tips are just that, you cannot replace the tip only the whole pen. Replacement tips have one base and you can switch tips. I prefer fixed tips so I can switch mid burn and don’t have to wait for the tip to cool to take it off the base. Since I switch pens at least twice in every burn fixed tip work best for me.

7. Sand paper. Essential! If the grain on a piece of wood isn’t sanded down enough the pen will get stuck in the grooves and create a funky burn. Nearly every piece of wood can benefit from a quick sand to make sure the end result is pleasing.

That’s all from me! It’s been so much fun to work on the books during the day and burn at night – hope to see you in November ^_^

lamp lights

lamps

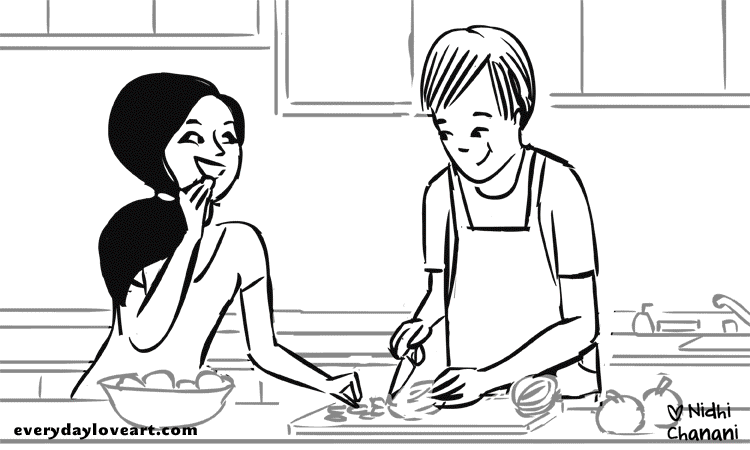
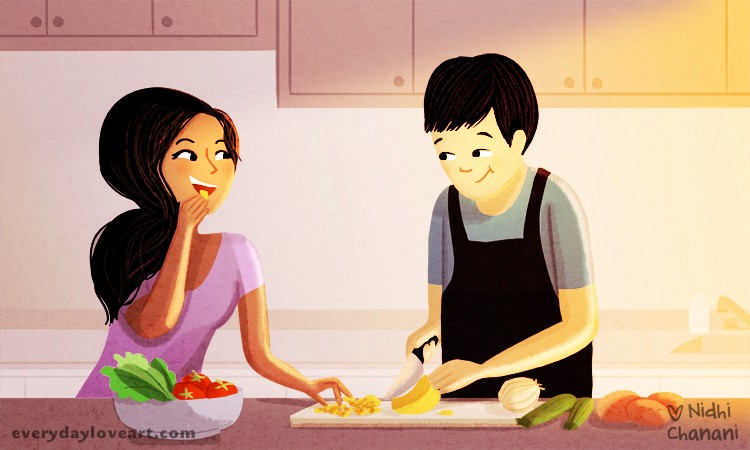
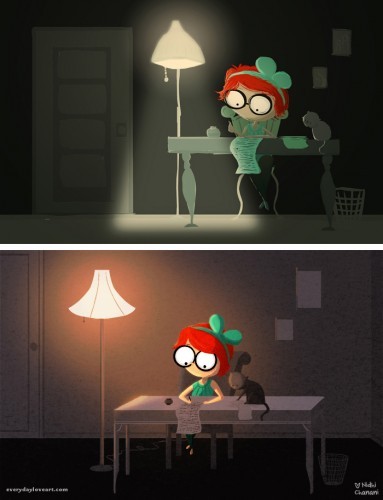
I created the top illustration 4 years ago. The bottom one I created last week. Why did I redraw this illustration? I don’t love or hate it, but I knew (or I hoped) I could re-approach it and do better. I remember creating that illustration years ago and even now I don’t see much WRONG with it. It contains all the elements I focus on today: character, storytelling, composition, mood and lighting.
The differences between the two are fairly clear. I understand the clothed figure better: arms and necks can be skinny if that’s your artistic style but not so tiny that it wouldn’t be able to hold up that large head. I know that it’s quite rare to see a table directly without any perspective. I am no longer sloppy with my lines and shapes, a trash can has a bottom, top and sides, and the legs of a table and chair have to feel solid and secure. I utilize reference to draw a lamp so it isn’t simply my mental idea of a lamp. My understanding of color has also improved. I know when to make a light warm or cool, I understand better how strong and mild highlights and shadows are depending on the light source.  I add texture for an organic feel, which I have come to love and appreciate in any digital work.

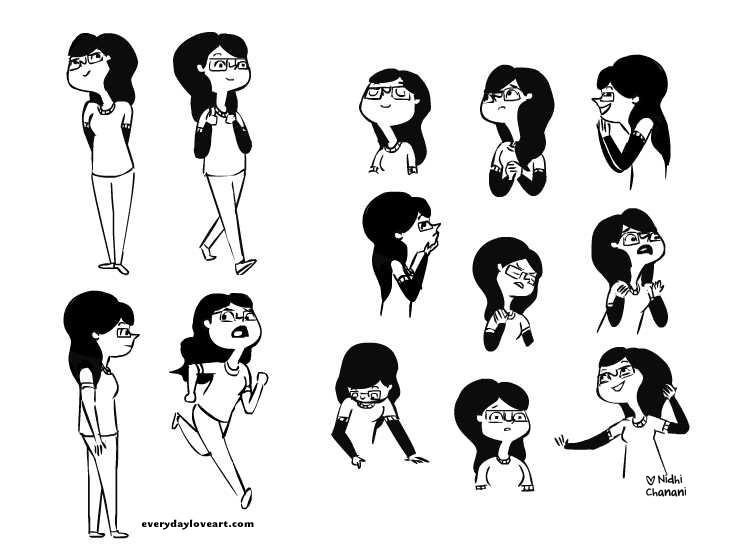
How did I learn all of these things? I read articles, talk to artists but the way I’ve seen the most direct improvement is by drawing. Sketching from life, with different materials, creating and sharing complete illustrations, comics, and painting. Each time I try something new I am not just nervous – I am TERRIFIED!

Draw a shark – Um, what does a shark look like? Like JAWS?
Draw a crowd of people – No, why!? Whyyyyyy! Can we just change the scene?
Draw a bird’s eye view perspective – Okay, that’s it. I give up. I’m going to pursue a career in kitty cuddling!

Even the idea of a throwback illustration made me nervous: what if my new version looks the same? I was very worried the early version was better. There’s a spontaneity and love that comes with original work – revisiting or copying doesn’t hold the same passion. Ultimately, I am happy with both. That’s not typically how I feel about my work. Those changes are the result of 4 years,1,040 weekdays, and probably 4,000 hours of drawing.

Creating regularly, sharing regularly has taught me that it doesn’t matter if I love it. As the creator I will always wish I could change. I have to get out of my own way. I must focus and produce, even if it means sharing work that I am not pleased with. I used to think that if I didn’t love it, as long as someone ELSE did that was okay. But it’s not about me, you or anyone else loving the work.

It is quite simply about making art.

Making art is joyful and painful. It is an awful feeling when you sit in front of a blank canvas and struggle with your limitations. And when people walk past your art without noticing, or worse yet when they comment negatively. It is the greatest feeling when a stranger can connect with a piece of art you’ve created. It will always make you happy when someone says they have your art proudly displayed in their home. I have been lucky enough to experience all of these things – even the negative experiences help me grow, thicken my skin and push me forward. But I wouldn’t be able to experience any of it if I didn’t keep making art. I didn’t wake up good at art. If I didn’t try and fail again and again and AGAIN, I wouldn’t be able to share either of these.

Keep drawing. Keep making art.